Safely Disconnecting a Gas Stove: A Step-by-Step Guide
I. Introduction

A. Importance of safely disconnecting a gas stove
Safely disconnecting a gas stove is crucial for avoiding potential hazards and ensuring the safety of yourself and your home. This article aims to provide a comprehensive step-by-step guide on how to disconnect a gas stove safely and effectively.
B. Overview of the article’s focus on providing a step-by-step guide for disconnecting a gas stove
This article will walk you through the process of disconnecting a gas stove in a safe and efficient manner. It will cover the necessary tools and materials, safety precautions, and the step-by-step procedure to ensure a successful disconnection.
II. Preparing for Disconnection
A. Gathering the necessary tools and materials
To disconnect a gas stove, you will need the following tools and materials:
- Adjustable wrench: This versatile tool will help loosen and tighten connections.
- Pipe wrench: A pipe wrench may be needed for tighter connections.
- Pipe sealing compound or Teflon tape: These materials are used to create a secure and leak-free seal on threaded connections.
- Gas shut-off valve key or wrench (if applicable): Some gas stoves have a gas shut-off valve that requires a specific key or wrench to turn off the gas supply

B. Ensuring safety precautions
Before beginning the disconnection process, it is essential to take the following safety precautions:
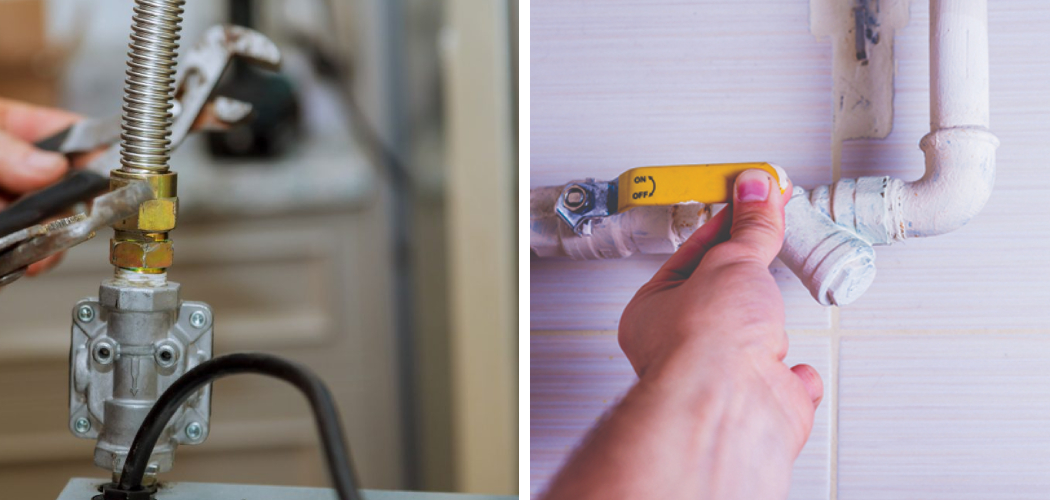
- Turning off the gas supply: Locate the gas shut-off valve and turn it to the “Off” position to stop the flow of gas.
- Ventilating the area: Open windows or use fans to ensure proper ventilation in the area where the disconnection will take place.
- Protecting nearby surfaces: Place protective covers or materials on nearby surfaces to prevent any damage during the disconnection process.
III. Disconnecting the Gas Stove
A. Turning off the gas supply
Locate the gas shut-off valve, which is typically located near the gas line that connects to the stove. Turn the valve to the “Off” position, usually perpendicular to the gas line.
B. Disconnecting the gas line

- Loosen the connection at the appliance end: Use an adjustable wrench or pipe wrench to loosen the connection where the gas line attaches to the back of the stove. Turn the fitting counterclockwise to loosen it.
- Using an adjustable wrench or pipe wrench to disconnect the gas line: Once the connection is loosened, use the wrench to fully disconnect the gas line from the stove. Carefully remove the gas line from the stove while keeping the end elevated to prevent any residual gas from escaping.
C. Sealing the gas line (if necessary)
- Applying pipe sealing compound or Teflon tape to the threaded connections: If the gas line has threaded connections, apply pipe sealing compound or wrap Teflon tape around the threads before reattaching it. This will ensure a secure and leak-free seal when you reconnect the gas line in the future.
- Ensuring a secure and leak-free seal: Tighten the connection using the adjustable wrench or pipe wrench to ensure a secure and leak-free seal. Be careful not to overtighten, as it can damage the threads.

IV. Safety Considerations and Final Steps
A. Checking for gas leaks
After disconnecting a gas stove, it is crucial to check for any potential gas leaks to ensure the safety of your home and those inside.
- Using a gas leak detector or a mixture of soapy water to check for leaks
One way to check for gas leaks is by using a gas leak detector, which can detect even small amounts of gas in the air. Follow the manufacturer’s instructions on how to use the detector properly. Alternatively, you can create a mixture of soapy water by combining water and a small amount of liquid dish soap. Apply this mixture to the connections and joints of the gas line using a brush or spray bottle. If there is a gas leak, bubbles will form where the gas is escaping, indicating a problem.
- Addressing any detected gas leaks immediately
If you detect a gas leak, it is critical to take immediate action. First, ensure the gas supply is turned off at the main valve. Ventilate the area by opening windows and doors to allow gas to disperse. Do not use any open flames, electrical appliances, or switches, as they can ignite the gas. Contact your local gas company or a professional plumber to repair the gas leak promptly. Gas leaks should never be ignored or left unattended.
B. Proper disposal or storage of the disconnected gas stove

Once the gas stove is safely disconnected, it is important to follow appropriate disposal or storage procedures, adhering to local regulations.
- Following local regulations for disposal or recycling
Check with your local waste management authority or recycling center to determine the proper disposal methods for gas stoves. Many areas have guidelines in place to ensure the safe disposal of appliances. Some jurisdictions offer appliance recycling programs, while others may require you to schedule a special pickup or drop-off at designated locations. Make sure to comply with these regulations to protect the environment and prevent any potential hazards.
- Safely storing the gas stove if it will be reused or relocated
If you plan to reuse or relocate the gas stove, it is important to store it safely. Clean the stove thoroughly, ensuring there is no residual gas or debris. Store the stove in a dry and well-ventilated area, away from any flammable materials. If possible, keep it covered to prevent dust accumulation. If you are unsure about the proper storage or handling of the gas stove, consult the manufacturer’s guidelines or seek professional advice.
In conclusion, safely disconnecting a gas stove is essential to ensure the safety of yourself, your home, and others. By following the step-by-step guide provided in this article, you can safely disconnect a gas stove with confidence. Remember to gather the necessary tools, turn off the gas supply, and properly disconnect the gas line. Take safety precautions, check for gas leaks, and follow local regulations for disposal or storage. Prioritize safety and, if needed, seek professional assistance to ensure a smooth and secure disconnection process.
